I have two 1969 K1 CT90's that I am bring back to life and as I got to where they we running again, I ran into that unique problem that all the K1 owners run into and that is the rubber boot between the carb and air cleaner is unusable. The only real alternative is to buy a new one at
DrATV/Beatrice for $66.99 or try and find one on eBay at a reasonable price, which was unlikely.
My goal with each of these K1's is to build a reliable runner to sell and not really restore them to their original condition, so I was flexible on what I could use for an air filter and I decided to go with a stubby style air filter. After a little searching on Amazon, I found
this air filter by Huri that said it would fit on a CT90 and the price was right at $8.25 with free shipping using Prime. In the end I am happy I purchased this air filter for my 1969 K1 CT90, but for other CT90 models I may have a different recommendation as I explain below.
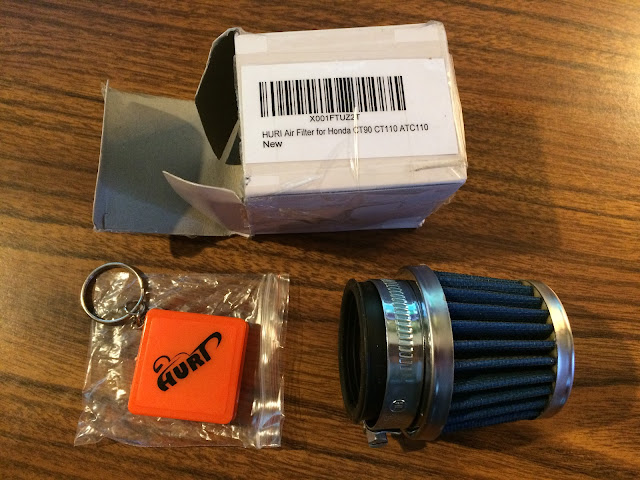
This is a picture of what I received after I ordered the filter from Amazon:
In addition to the filter, a appropriate sized hose clamp is included along with a small 36 inch tape measure. The hose clamp does not look like it is made from stainless steel, so while it has a nice appearance it may be more susceptible to corrosion over time.
I took some measurements and the dimensions of the filter assembly are as follows:
The overall length was 2 3/4 inches
The maximum diameter was 2 1/4 inches
The depth of the opening that mates to your carb was 5/8 of an inch deep
The diameter of the opening that mates to your carb was 1 5/8 inches
The advertised opening diameter on Amazon was 38 mm which is about 1 1/2 inches which is close to what I measured and is probably the most important dimension as this is the diameter that interfaces with your carb.
Here is a picture of the filter and clamp
The rubber element is held to the filter buy a simple lip at the end of the rubber element that can be separated from the filter as shown in the next picture.
The filter assembly looks well constructed and consists of a filter element glued at each end to a stamped sheet metal ends that are polished and or chrome plated.
The next picture is of the filter with the rubber element reinstalled showing the inside diameter of the opening which contains circular ribs that should help with sealing of the interface when the filter is installed and clamped.
When I bought the filter I really didn't pay attending to the 38 mm diameter of the opening that was in the description in the ad on Amazon because it also said the the filter was good for a CT90, which I assumed was any CT90.
In the end I got lucky as I was buying this to use on my 1969 K1 CT90 that has an 4 screw configuration carb that just so happens to have a 1 1/2 outside diameter for the end of the carb that mates to the filter, so this filter fit just fine as shown in the picture below.
I own several CT90's and happen to have a carb from a 1971 K3 CT90 setting on my bench and I checked to see how the filter fit up to that carb and found that it was very oversized and really not a good match for that carb configuration.
The picture below shows the carb from the K3 on the left and the carb mounted to my K1 on the right and you ac see the significant difference in the opening diameters between the two carbs. While the K1 carb has an opening of 1 1/2 inches (38 mm), the K3 carb only had an opening of 1 11/32 inches (34.13 mm).
Here is a picture of the filter slipped on the K3 carb showing the gap that exists
To see what would happen I tightened up the hose clap to see if the filter could be installed on the K3 carb and while I could get it to tighten down so the filter would stay on, it distorted the rubber element and almost was pulling it out of the rear of the filter as shown in the picture below.
I don't know the filter would stay attached to the rubber element reliably if you were to take your CT90 bouncing down the trail, so if I had a K2 or new CT and more specifically a CT90 that had a carb opening smaller then 1 1/2 inches I think I would look for a different filter assembly.
For my K1 CT90, I think this air filter assembly will work out just fine and would not have any problem recommending it to anyone who had a CT90 with a carb where the opening was 1 1/2 inches in diameter.
Helpful Links (Shop Manuals, Wire Diagram, Model Information, etc.)
Link to page with listing of CT90 parts available on Amazon


It’s important to find a trustworthy company that provides a high quality of work.
ReplyDeletewww.cosmopolitanmechanical.ca
that’s very cool and informative article I will bookmark it now.
ReplyDeletewww.furnaceacdirect.com