I'm continuing to find and endless number of opportunities to utilize my 3D
printer to make useful parts for my CT90 project bikes, my fishing float tube,
and other hobbies that I have. I thought I would share a few of the
latest CT90 parts that I have designed/modeled and printed.
All of the designs I share below, I first modeled using my ViaCad 2D/3D
modeling program.
Related Posts:
A New Batch of Honda CT90 and CT200 3D Printed Parts
More 3D Printed Honda CT90 Part Designs
3D Printed CT90 K1 Rear Airbox Snorkel
CT90 K1 3D Printed Carb to Air Filter Boot
A 3D Printed Valve Spring Compression Tool
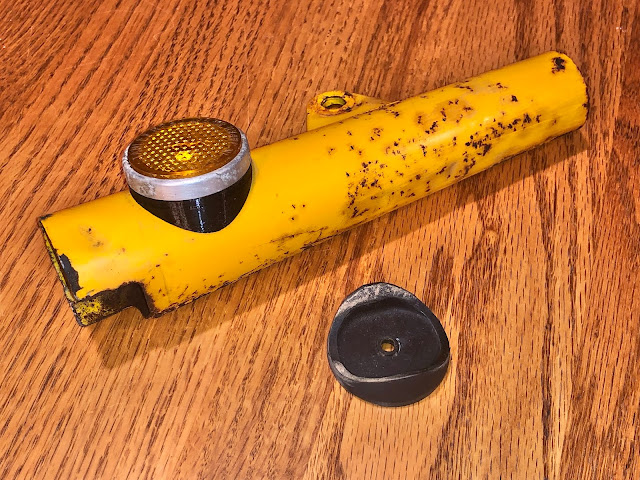
CT90 K1 Front Fork Cover Side Reflector Base
On almost every older CT90 I work on (I guess they are all old...) the little
rubber caps on that cover and help hold in the bulbs on the base of the speedo
are cracked, disintegrating before my eyes or are just missing.
I modeled up both a short cap that has a hole for one wire and a taller cap
that has a slot in its base that allows two wires to pass through as shown in
the pictures below.
When I modeled the reflector base I took into account the taper of the fork
cover and added a small raised dot for the end of the reflector base that
should point up. The 3D printed part is on the left in the picture above
and the stock Honda part is on the right.
I printed these reflector bases using SainSmart TPU and PETG and I think that
both materials work well for this application.
Here is the link to the .stl files at Prusaprints for the reflector base.
CT90 K1 Upper Triple Tree Turn Signal Mounting Hole Plugs
Someone had asked after I did an earlier post on plugs I had made for the rear
fender for the turn signal holes if I could make plugs for the turn signal
mounting holes in the CT90 K1 upper triple tree, so I did and here they are.
That are similar to the original plugs and will functionally fill the holes.
I made the design of the features that fit into the holes slightly different
than the original Honda plug designs as I printed these parts using SainSmart
TPU which is significantly stiffer, but again still functional.
I have included links to .stl files below, but if you don't have a 3d printer
I also sell a set of these plugs on eBay here at this link.
Here is the link to the .stl file at Prusaprints for the plug.
CT200 and CT90 K0 & K1 Battery Compartment Bumper
I've noticed on some of my older K0 & K1 CT90's and also on my CT200's
that they have a round bumper on the back wall of the battery compartment.
I still had one of these rubber bumpers so I decided to create a model
of the part so that I could print copies on my 3D printer.
Here is a shot of the original bumper.
Here is a shot of the part I modeled and then printed next to the original
rubber bumper.
Here is the 3D printed bumper printed in TPU installed is a CT200 frame
Because the TPU is not near as stretchy as rubber, it is a little tough
pulling the stub of the bumper through the hole in the frame, but with a
little grease, twisting and the help of a small screwdriver, the bumper was
installed. Using a lower durometer filament would make this part
easier to install.
Here is the link to the .stl file at Thingiverse
Here is the link to the .stl file at Prusaprinters
CT90 K1 Front Fender Reflector Holder - A Work in Progress
I've been working off and on on this part as I have been finding it difficult
to come up with a model of this part that prints well.
In the picture below the stock reflector holder with the metal band is on the
left and the three on the right are different 3D printed designs I have tried
with varying degrees of success. The two right most designs are made
from PETG and have a split on the lower edge to allow for installation of the
reflector. The one 3D printed design in the lower center with the
reflector installed is made from TPU and the reflector snaps into place.
In the end I think I will have a design that is almost identical to the stock
part in that it will accept the metal band that wraps around the stock
reflector holder. I also think I will have an all plastic design out of TPU or
PETG that won't use the metal band.
I'll update this post in the future when I get a final design I like figured
out.
I hope you found this information useful.
Helpful Links (Shop Manuals, Wire Diagram, Model Information, etc.)


Very much thanks i would like to buy when your final design is complete thanks
ReplyDelete