Posts

Showing posts from September, 2017

Honda CT90 Engine Reassembly

Image
I have one 1971 CT90 where I was going to rebuild the clutch because the kickstarter just wasn't turning over the engine like it used too,  and I also had a Big Bore kit from DrATV that I wanted to install. My intent was to just do the top end and rebuild the clutch with new disks, but when I opened up the cases to rebuild the clutch pack I found a slick black slime in the bottom of the case.  I didn't like the idea that there could be black slime in the rest of the engine, so I decided to disassemble the entire engine to make sure I cleaned everything out.  Since I was tearing everything apart I thought I would document step by step how everything goes back together in this post in case others were interested in knowing what the inner workings of a CT90 engine look like. Links to Related Posts: My Honda CT90 Clutch and Headset Nut Tool Cut Away of a CT90 Engine - CT90 Engine Exposed! Repairing Damaged CT90 Spark Plug Threads Using a Time-Sert Thread Insert CT90 Clutch P

CT90 Testing Issue With Harbor Freight Compression Tester and a Correction Factor to Fix the Issue

Image
One of the most basic things you can do to check the health of your CT90 is do a compression check. The compression tester I own is one I picked up at Harbor Freight made by U.S. General.  The compression tester comes as a set that includes the basic gauge and attached hose along with three adapters that fit most typical spark plug applications, including the one that fits the CT90 spark plug hole. While I have never had any issues using this compression tester on any of my cars, when I have used it on my CT90's it always seemed to give me an abnormally low reading even on bikes where I had just redone the top end with a new piston, freshly bored cylinder, and lapped and correctly adjusted valves. I also noticed while spending some time on various on-line sites that other people were having the same issue with this compression tester, so I decided to spend a little time and try to better understand the low results being seen with the use of this compression tester, especially

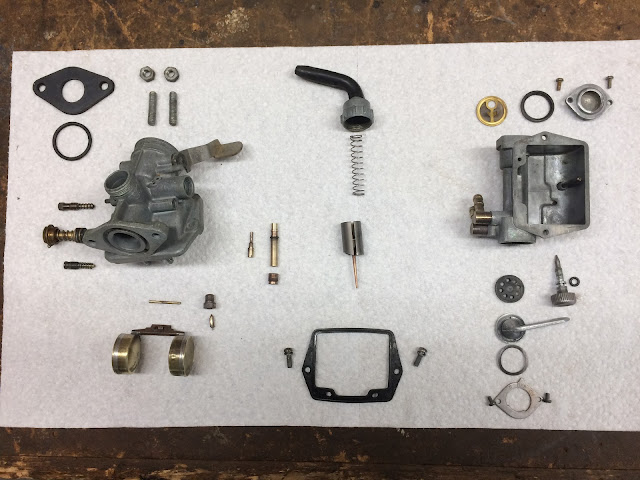
Step by Step Instructions for the Reassembly of a Basic Two Screw Honda CT90 Carburetor

Image
Anyone who ever buys a CT90 will at some point in owning the bike have to disassemble, clean and reassembly a CT90 carburetor.  The focus of this post is really just on the reassembly of the carburetor.  So after you have disassembled and cleaned all of the parts of your carb and picked up a new gasket set (or reused your old gaskets) you're ready to reassemble your carb.  The terminology I use in my descriptions below is my own and may not be exactly the same as what is called out in a Honda manual, but I hope it is clear enough for you to understand which parts I am working with. Link to related Posts: Adjusting and Jetting a CT90 Carb With respect to a new gasket set, I generally wait until I have disassembled the carburetor before I make the decision to buy a new gasket set.  I have found that most of the time the condition of the old gaskets are just fine and I'll apply a little RuGLYDE to freshen up the elastomeric parts and seals and just really make sure all of t

Simple Method to Check if the Holes are Clear in your CT90 Carburetor Emulsion Tube

Image
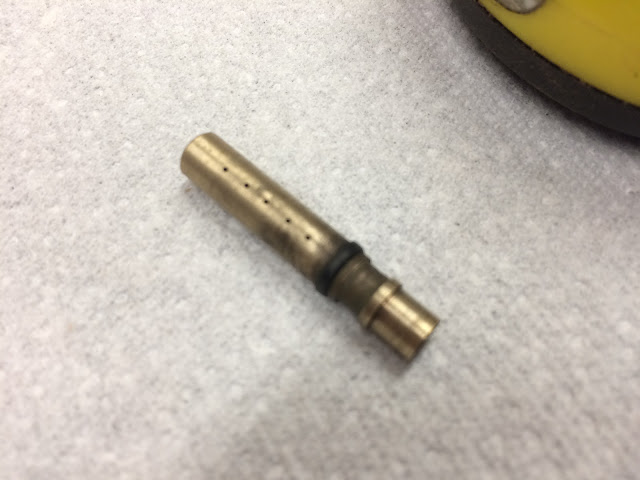
One of the most important steps when you are rebuilding or just cleaning your CT90 carburetor is to make sure that you check that all of the small holes along the side of your emulsion tube are free and clear. One simple way that I check my emulsion tube before reassembling it back into my carburetor is to use a LED flash light. Here is a picture of a typical emulsion tube showing the very small holes that exist along the length of the tube above the o-ring.